Monday, August 6, 2012

So what did you do last weekend? Well, I made a basket. Out of blinds.

Remember when I made this?

Out of this?


So I had a bunch of the slats left over, and in my true "I'm sure I can use these for something" style, I kept them.  Finally last weekend, I was inspired.  I decided to make a basket.  I've never made a basket before, but I figured, why not? 
So I laid out 12 of the slats, figuring they're about an inch or so.  I hate actually measuring stuff.  Then I started weaving 12 slats the other way.  I found that it was easiest to put a slat under all the others, and then pop every other slat underneath, rather than actually weaving it in and out.  I staggered every other one too, to make it easier.  Then I just slid the one slat to the middle.

So it started to look like this.

I continued until I had 12 slats each way, and it looked all loose and uneven.  So I tightened it up, little by little, starting in the middle and working my way out to each side.  The slats like to slide around, but each time I slid them a little bit tighter.

So I was thinking that I'd bend each slat up and then start weaving a slat around the outside.
It was a good idea, in theory.  But in reality, the slats are pretty brittle.  When I bent them and then un-bent them, they broke.  Oh.  That's not going to help.  Then I got frustrated and took a break until the next day.  

I really didn't want to substitute non-broken slats, thinking they would probably just break too and then I'd run out of slats and then the whole project would be in the trash and all my hard work would be for nothing!!  Original plan, find some pretty duct tape to wrap around each slat on the bottom to reinforce and repair.  Search my craft stuff looking for duct tape.  Fail. Not even regular silver duct tape.  Not even regular clean packing tape!  Grr! Where did all my tape go!!
Insert impromptu trip to the new Dollar Tree I found near my house (which I was a little too excited about finding, btw!!).  No pretty duct tape there either.  I did find some green stacking bins and assorted other things for organization.  I picked up the duct tape, walked around with it, then decided that I didn't want my pretty basket marred by ugly silver duct tape and only bought the organizing stuff.
To plan B!  Use scotch tape to reinforce/repair.  Wrap fabric around slat so no one sees scotch tape.

I found this pink sturdy looking fabric in my stash.  Cut it into 48 little rectangles, sprayed with spray adhesive and wrapped around each slat over the scotch tape.  Hopefully this will help hold the broken ones together and prevent more breakage.

I ended up with this.  And very sticky fingers!! Spray adhesive gets everywhere but I still love it!

The next part was tricky.  I started weaving slats around the outside and bending the sides up as I did them.  It didn't want to stay where I put it, but I kept going, adding more and more layers up the sides.
I used binder clips to hold slats in lower 'layers' while I added the higher layers.

One slat by itself wasn't long enough to go around the entire circumference (big word, I feel smart haha!) of the basket, so I hot glued 2 of them together.  This was waaaayyyyy too long, so I had to trim them to fit better.

So I kept going.  The lower levels got tighter as I went higher.  I could just tuck the loose end in on itself without gluing it, it stayed well.  I just kept weaving and tightening.  Tightening and weaving.

So I got it as tall as I wanted, and used binder clips to hold the top layer on all 4 corners.  As soon as I would tighten one corner on the top, the other one would pop up!  Binder clips to the rescue!

To hold the top layer (without the binder clips, that wouldn't be very pretty!)  I put a tiny dot of hot glue to hold it.

Then I trimmed the tall slats level to the top of the basket.

To finish off the raw edge I hot glued a slat to both the outside and the inside of the rim of the basket.  I put the dot of hot glue on the woven part of the basket, waited a second or two, then pushed the extra slat on.  The glue is so hot that it makes a little melt mark on the plastic slat when it first comes out of the gun.  And it burns your fingers too, so be careful!!!  (yes, I am speaking from experience!)

Be careful, it's hot!

I did it on the inside too

The finished product!!  It is actually level, it's just on my couch so it looks all wonky.
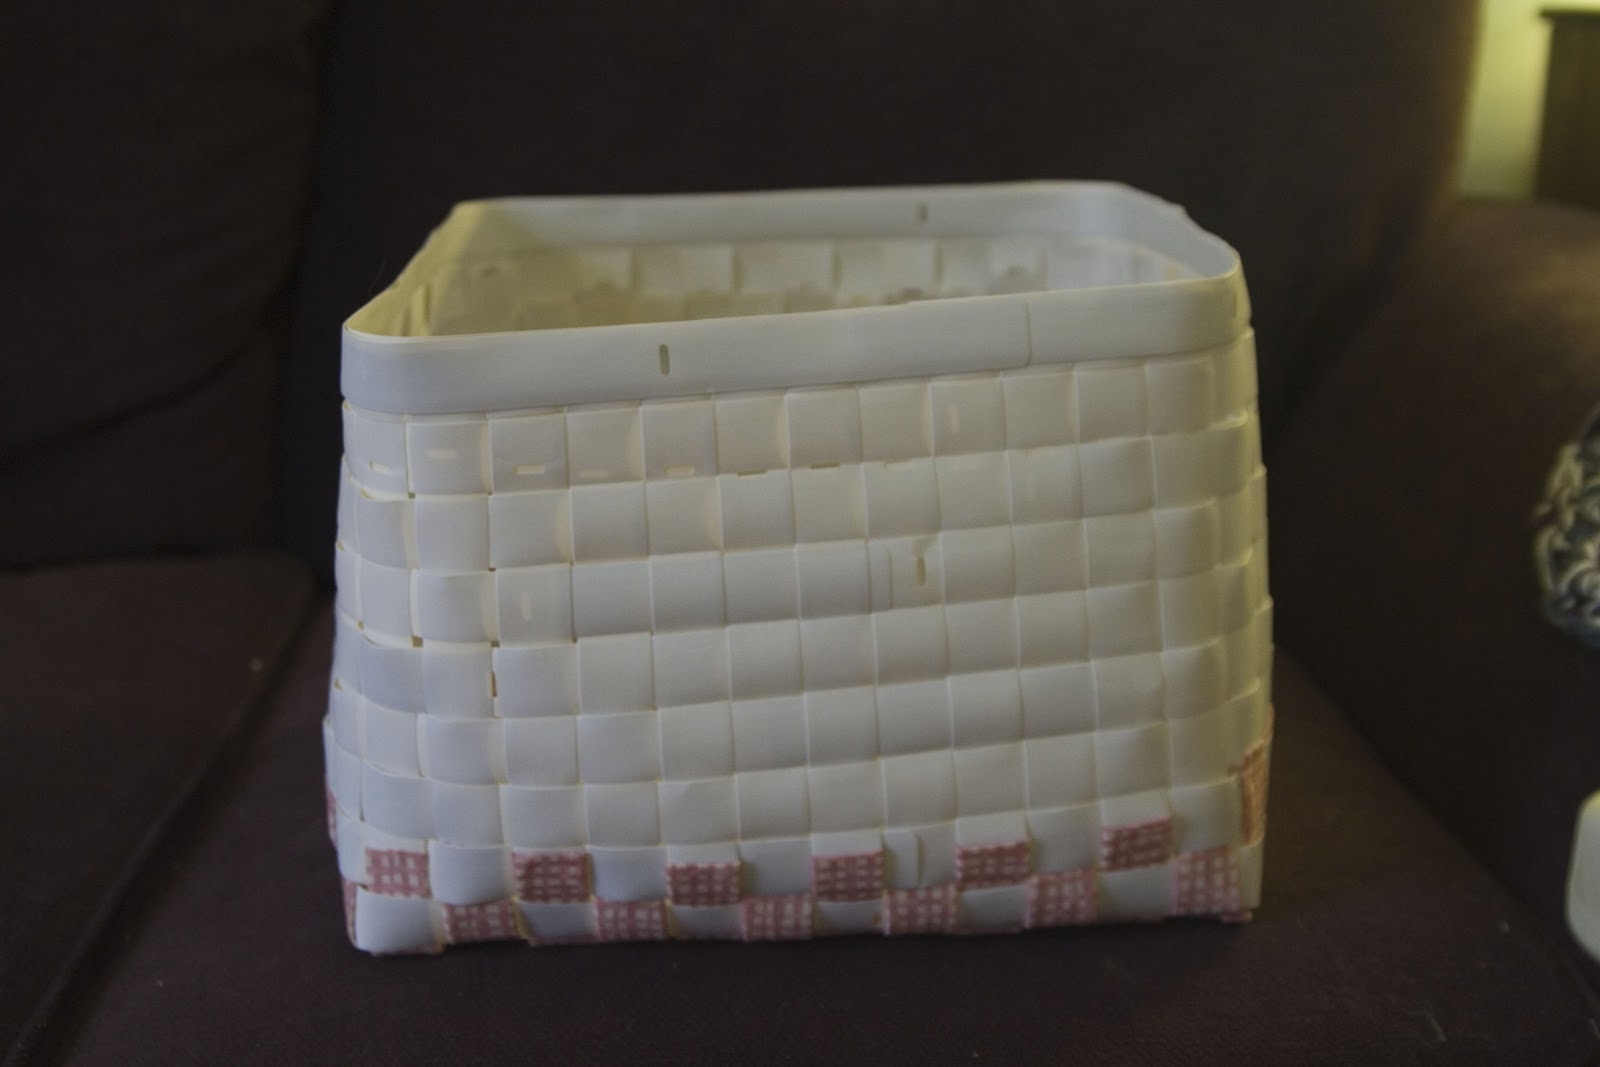
The inside!

So now I have to decide, do I want to keep my masterpiece and use it, or do I want to try to sell it?  And if I sell it, that means I have to do research to see how much I should charge for it. Hmm, that sounds like a lot of work.  Maybe I'll just keep it.

Sunday, July 15, 2012

Peanut Butter MAGIC


When I saw This Pin on Pinterest I had a feeling I was in trouble.  I LOVE Reese’s, so of course I had to try it.  And it didn't help that Tonya at bakerlady.wordpress.com made it look so delicious! So, I assembled my ingredients, melted butter, powdered sugar, and graham cracker crumbs.  I wasn’t lucky enough to have pre-ground up graham crackers, so the longest part of making this was me breaking up whole graham crackers and crushing them in my teeny tiny 1 cup food processer!!  So, if you are smart, you will either buy pre-crumbed graham crackers or a bigger food processor!!
So, I mixed these 3 things together with the peanut butter and got this, less than appetizing looking concoction:

Forging on, I smushed it down into my pan.  At this point I was wishing I had one of those fancy, offset spatulas that  BakerLady had!


So I melted some chocolate chips in the microwave (my microwave has a handy ‘melt’ button! Score!) and added a little peanut butter.  I spread this over the top (again, wishing for a fancy offset spatula) and tried to make it look pretty with my fancy butter knife spreader!


I put the whole shebang in the fridge and waited the required hour before running to the fridge to taste the deliciousness!  Along with not owning a fancy offset spatula, I also do not own a fancy pastry scraper.  But for this I wish I did.  Cutting with my fancy butter knife resulted in this mess.


And the verdict: Although maybe not so pretty as BakerLady’s, these peanut butter bars are so YUMMY that this 8x8 pan didn’t last the night!


So, if you decide to make these, be warned: they are very addictive!!!  I try to hold off as long as I can between making batches of them because I can literally eat an entire pan.  By myself.   In one day.

So here's the recipe:  (from Bakerlady who got it from Let's Dish--this recipe gets around!)

Reese’s Peanut Butter Bars(from Let’s Dish)
Ingredients
1 cup butter melted
2 cups graham cracker crumbs (use the boxed kind, or grind them in a food processor. Tiny granules.)
2 cups confectioners’ sugar
1 cup + 4 tablespoons peanut butter
1 1/2 cups semisweet chocolate chips
Directions
In a medium bowl, mix together the melted butter, graham cracker crumbs, confectioners’ sugar, and 1 cup peanut butter until well blended. Press evenly into the bottom of an ungreased 9×13 inch pan. In a metal bowl over simmering water, or in the microwave, melt the chocolate chips with the peanut butter, stirring occasionally until smooth. Spread over the peanut butter layer. Refrigerate for at least one hour before cutting into squares.

Break's over!

Sorry for the long break, I was off busy getting married!! After the wedding and the honeymoon (both were PERFECT!!) I spent a while enjoying just doing nothing!

Now I've got a few projects in the wings just ready for posting!

Monday, April 23, 2012

Shades of Romania

So how come it always seems that when you move into a new house the window coverings are always that last things to get changed? No? Just me? Ok then.

Moving on!

The large window in my kitchen had a set of mini-blinds on it when we moved it.  This is one of the cat's favorite windows to bird watch from and somehow, one of the ladder thingies that make the slats turn broke.  It wasn't holding them up on one side and so the blinds had a lopsided, trashy look.


Here's the likely culprits at work:

Then one day, while I was wasting many many hours looking at all the fancy things on Pinterest, I stumbled upon this project:

I though...hmm, that would be perfect for my broken blinds!!  Alright, step one: take down blinds and take them apart.  Easy, but very dusty!

I measured my window and drew a couple of drawings to try to figure out how many slats I needed to save.  I'm not very good at explaining this step, but over at 365days2simplicity.blogspot.com Angela does a great job with it.  Thanks Angela!

I used fabric glue instead of the heat and bond.  That probably would have been easier, but I had the glue on hand and didn't want to go out to the store :)  The heat and bond probably makes a cleaner looking hem too.

Then I glued the slats down on the fabric.  The fabric glue didn't stick to the slats, so I used contact cement. I was afraid it would show through, but I used just enough to stick.


Then I let the whole thing dry for a while on the floor.


And ta-da!  The finished product!  Because the fabric I used has some sheen to it, it shows all the little imperfections from my DIYness...But it's still light years better than broken mini blinds!

And open...which is the way they stay mostly as this window faces the back yard.  After I looked at this picture I was able to un-stick the fabric and re-stick it so the wrinkles aren't as noticeable.
I want to try to make a small slit, or buttonhole up at the top where the cord is, because lowering the shade is kind of awkward... But now that it's up I don't want to take it down again!

We'll see how long it takes for me to get motivated for the last minute buttonhole...or how long the awkward lowering takes to annoy me enough to motivate me!!

Saturday, March 31, 2012

I love shiny things!

I have too many keys on my keychain.  I'm sure I'm not the only one with this problem, since the stores sell so many key covers and things so people can tell their keys apart.  I'm too cheap to buy something like this, and it feels like it would be cheating since it's gotta be so easy to make a key look different!!

So I saw this (on Pinterest, of course!) http://wrightlife.webs.com/  Scroll all the way down to the bottom for the glitter key post.

I made mine a little different since I'm no longer a renter (woo hoooo!!!) and I'll have my house key for a very very very long time, or so I'm planning.

This is what I started with..lots of keys..all either silver or gold. Cue me struggling at my door making sure I grab the right one

Instead of using clear nail polish since I'm not worried about having to give my key back, I used spray glue and a clear spray sealer.
 I taped off the part of the key that needs to stay glitter free using painter's tape.  Make sure you cover the whole length of the key if you're using spray glue, it gets everywhere!!
 Spray one side at a time and cover in your glitter
 Let it dry for a while. Don't forget to get the edges of the key too, or you will have gold edges peeking out.
 I did 2 coats of spray and glitter, just because I liked a little more depth to the glitter.  You can do however many you want.  It might also look interesting if you layered different colors!

Then I sprayed a coat of sealer on each side and let it dry some more.  It doesn't take long for either the spray glue or the sealant to dry, just a few minutes.
 The finished product, back among it's fellow keys but looking fabulous!!  I love being able to quickly grab my house key and not have to fiddle around with all the keys.  It's got a different texture too so if it's dark I can feel which one it is!  This is great because many many many (uh, yeah, really this many!) days we forget to turn the outside light on before we leave.
And I just love looking at shiny, sparkly things.  They make me smile.  So now I look at my keys and smile!

Sunday, March 25, 2012

Some good clean fun!

This is one of those projects that took me weeks to finish.  I don't think it would take your average person this long, but for me, weeks!
I had seen lots of people making their own liquid hand soap from just 3 ingredients, grated bar soap, glycerin, and water, and I usually get annoyed at having to buy liquid hand soap so often.  I mean, really!  Why is the stuff so expensive??? I know it's mostly water, but until the magic that is pinterest, I had no idea I could make it myself!
I had also heard that if you microwave Ivory soap, it does fun things.

Put the two together, and BAM!  Some good, clean fun!

I don't have any kids to do this with, but I do have a fiancee who is open to any type of fun, so I began with this.  We put it in the microwave for 1 minute increments, each time watching in amazement as it grew bigger and bigger!!
It looks delicious!! Looks can be deceiving though, believe me!! haha!
Anyways...once the fluffy soap cooled off (that cake is full of steam on the inside, be careful!) it gets kinda brittle and crumbly.  I figured, hey, I can just break it up into little pieces instead of having to grate it, right?
So into the pot with one gallon of water and 1 tablespoon of the glycerin. 

 
I let it 'cook' on low heat until it looked like all the soap had dissolved.  It just looked like soapy water, which really, is what is was. Then I turned off the heat and just let it sit there until it got cold.  Enter the reason it took me so long to actually complete this project.

The first time it came out a little too thick.
See?  I remembered reading that you can just add water and mix it in with a mixer to make it not so thick.  So I tried. 
I just guessed at how much water to put in.  When I was done, I had enough soap to fill a gallon jug + an old liquid soap container that I had.
It took another two weeks to use up the soap we already had in the dispensers, and when it did I got very excited.  I get to try my homemade soap now!!!!  That didn't last very long, because when I pulled out my gallon jug that had been full of soap, this is what I saw: 
What happened??? How could my beautiful liquid soap have turned into this thick, clumpy mess??
I'm still not sure if it's because the soap didn't actually melt all the way or if it's because the soap was cold when I tried to mix in more water.  Whichever it was, I went back to square 1...or square 2 really, and heated it back up on the stove.  I added a tsp more glycerin and some more water too, just to be safe. 


After letting it get cool again (and having to transfer half into another container because of all the water I added)  This time it turned out too thin!!!  Ahhhh! I just can't get it right!
Frustrated, I let it sit for another week, mulling over how I can fix this soap disaster.
I decide to grate 1/2 a bar of Ivory soap, cook it with a small amount of water (just enough so it makes a liquid) and then add this 'thickener' to the too thin soap a little at a time, waiting in between to make sure I don't make it too thick.

So far so good, but I've still got my fingers crossed!!  The soap seems to be perfect, or as near as I'm willing to get it, consistency.  In the pan it looked kind of like snot, but then in the containers it seems just right.

So for those of you who need more precise measurements than my 'a little of this a little of that' description..here goes:

Ingredients: 
1 bar Ivory soap
1.5 gallons water
1 Tbsp glycerin

Grate Ivory soap.  Or have some fun watching it get huge in the microwave, just be SURE you crumble it into tiny tiny pieces.  And be careful of the steam.

Mix all the ingredients in a pot and heat on low heat, stirring occasionally, until all the soap is dissolved.

Turn off heat, let cool.  This takes a few hours, so find something else to do while you wait!

Check the consistency, it should be snot-like and gooey.  If it is too thick, reheat and add a small amount of water.  If it's too thin, reheat and add some more grated soap.  This part is a little trial and error until you get it right.

Once your consistency is where you like it, get a lot of empty containers to put your new soap in and enjoy!